HEAR SOIL is an interdisciplinary project that builds on ‘HEAR WATER‘, expanding to embrace the subterranean sounds beneath our feet. HEAR SOIL aims to introduce new methods for teachers to engage pupils with listening, nature connection, sounds of nature, soil science, music technology, creativity and wellbeing. The HEAR SOIL research team are: interdisciplinary artist Kathy Hinde, artist educator Jill Parsons, creative technologist and artist Matthew Olden, Professor of Music Amanda Bayley at Bath Spa University and Soil scientist Sam Bonnett at University of the West of England.
HEAR SOIL introduced the following activities as a provocation to co-create learnign resources for teachers in primary and SEN/D educational settings.
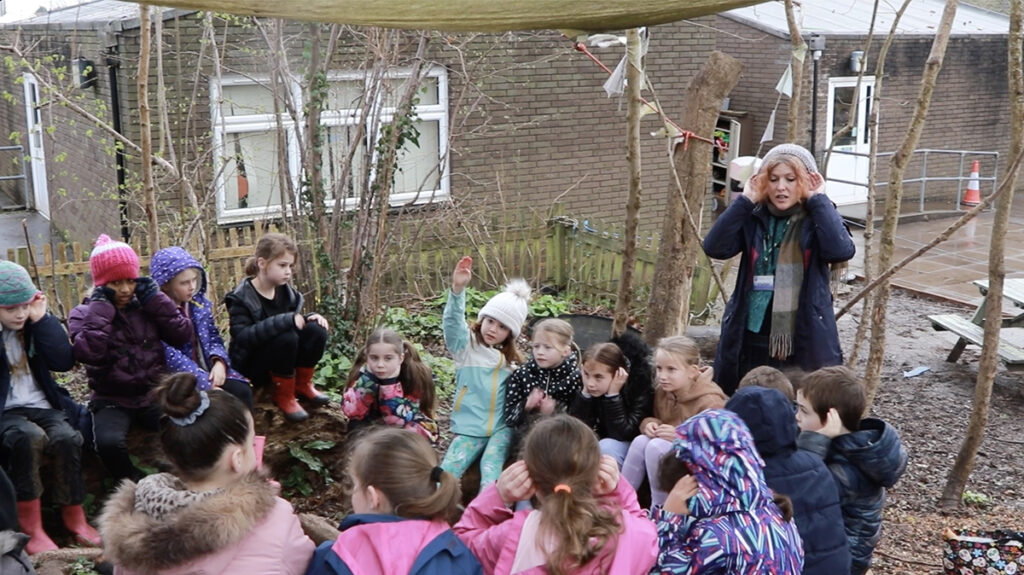
• GROUP LISTENING ACTIVITIES
Focusing on the sounds around us can be a wonderful way to begin outdoor activities with children. Pairing this with simple grounding exercises can help children settle, concentrate, and become more present. Taking time to listen to the natural soundscape not only strengthens a child’s connection to nature, but also sparks their imagination and encourages them to notice and appreciate the rich variety of sounds in their environment. Download a guide to listening games for children to participate in outdoors HERE.
• ENHANCING LISTENING – using objects to help us listen from new perspectives
You can introduce this activity by inviting children to think about how different animals hear the world. Explore how the shape and position of their ears help them detect and interpret sound. Sharing images of animals can help bring these ideas to life.
For example, a deer’s large, mobile ears can rotate to focus on sounds from specific directions, helping to amplify even the faintest movement nearby. An owl’s facial shape acts like a parabolic dish, funnelling sound toward its ears and allowing it to pinpoint exactly where a sound is coming from.
By reflecting on these adaptations, children can begin to imagine how small changes to the way we experience sound, perhaps by cupping our hands behind our ears and listening in different directions, can alter what and how we hear. These experiments may make use aware of sounds we had not first noticed, and enliven our ability to listen to and notice more sounds.
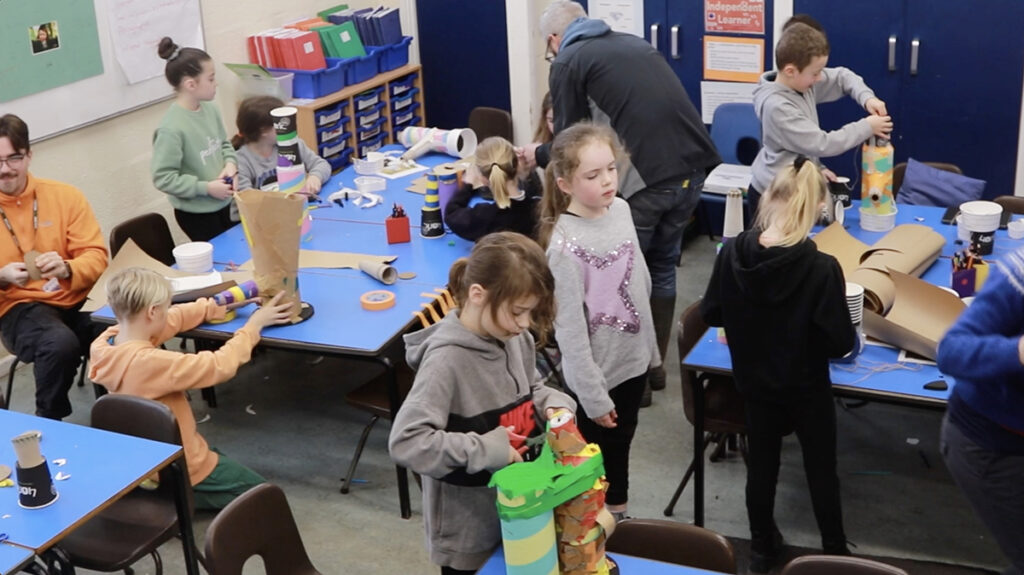
Provide a selection of tubes, cones, and horn-shaped objects for the group to experiment with as simple sound amplifiers. Encourage them to hold the objects to one ear, point them in different directions, and notice how certain sounds become clearer, louder, or more focused. Invite them to compare what they hear with and without the objects, exploring how shape and size can change the way sound travels and is experienced.
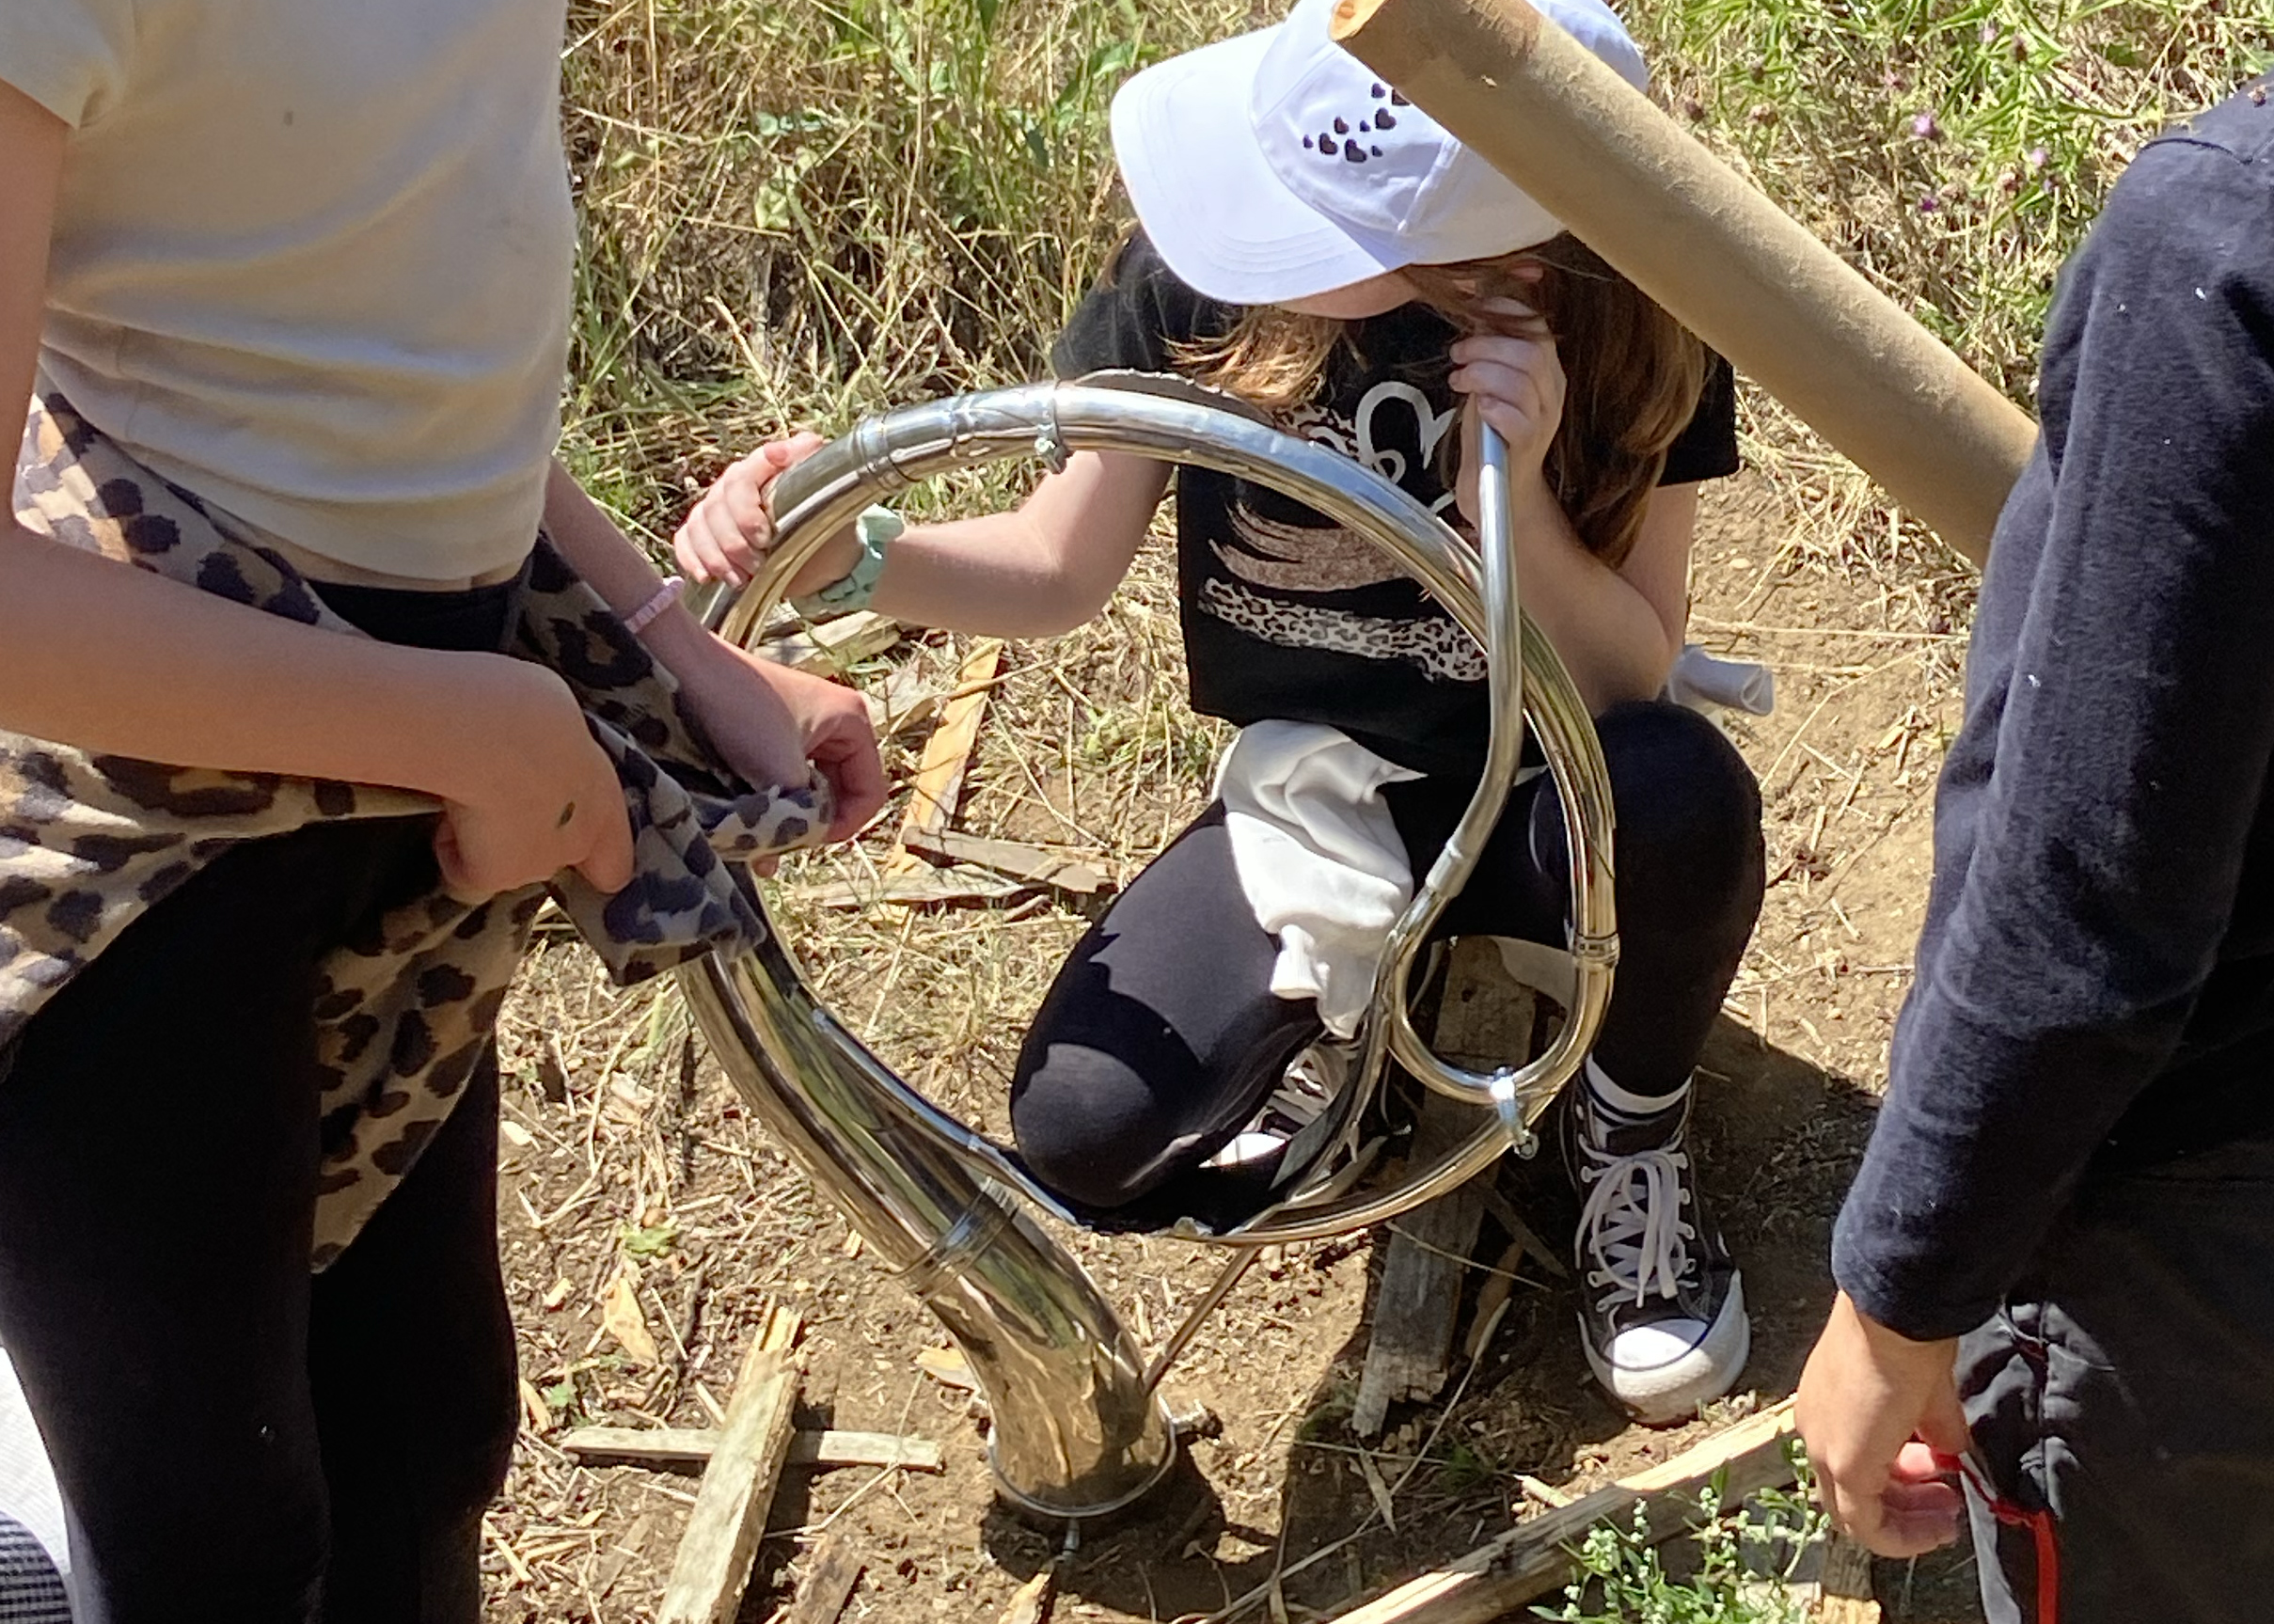
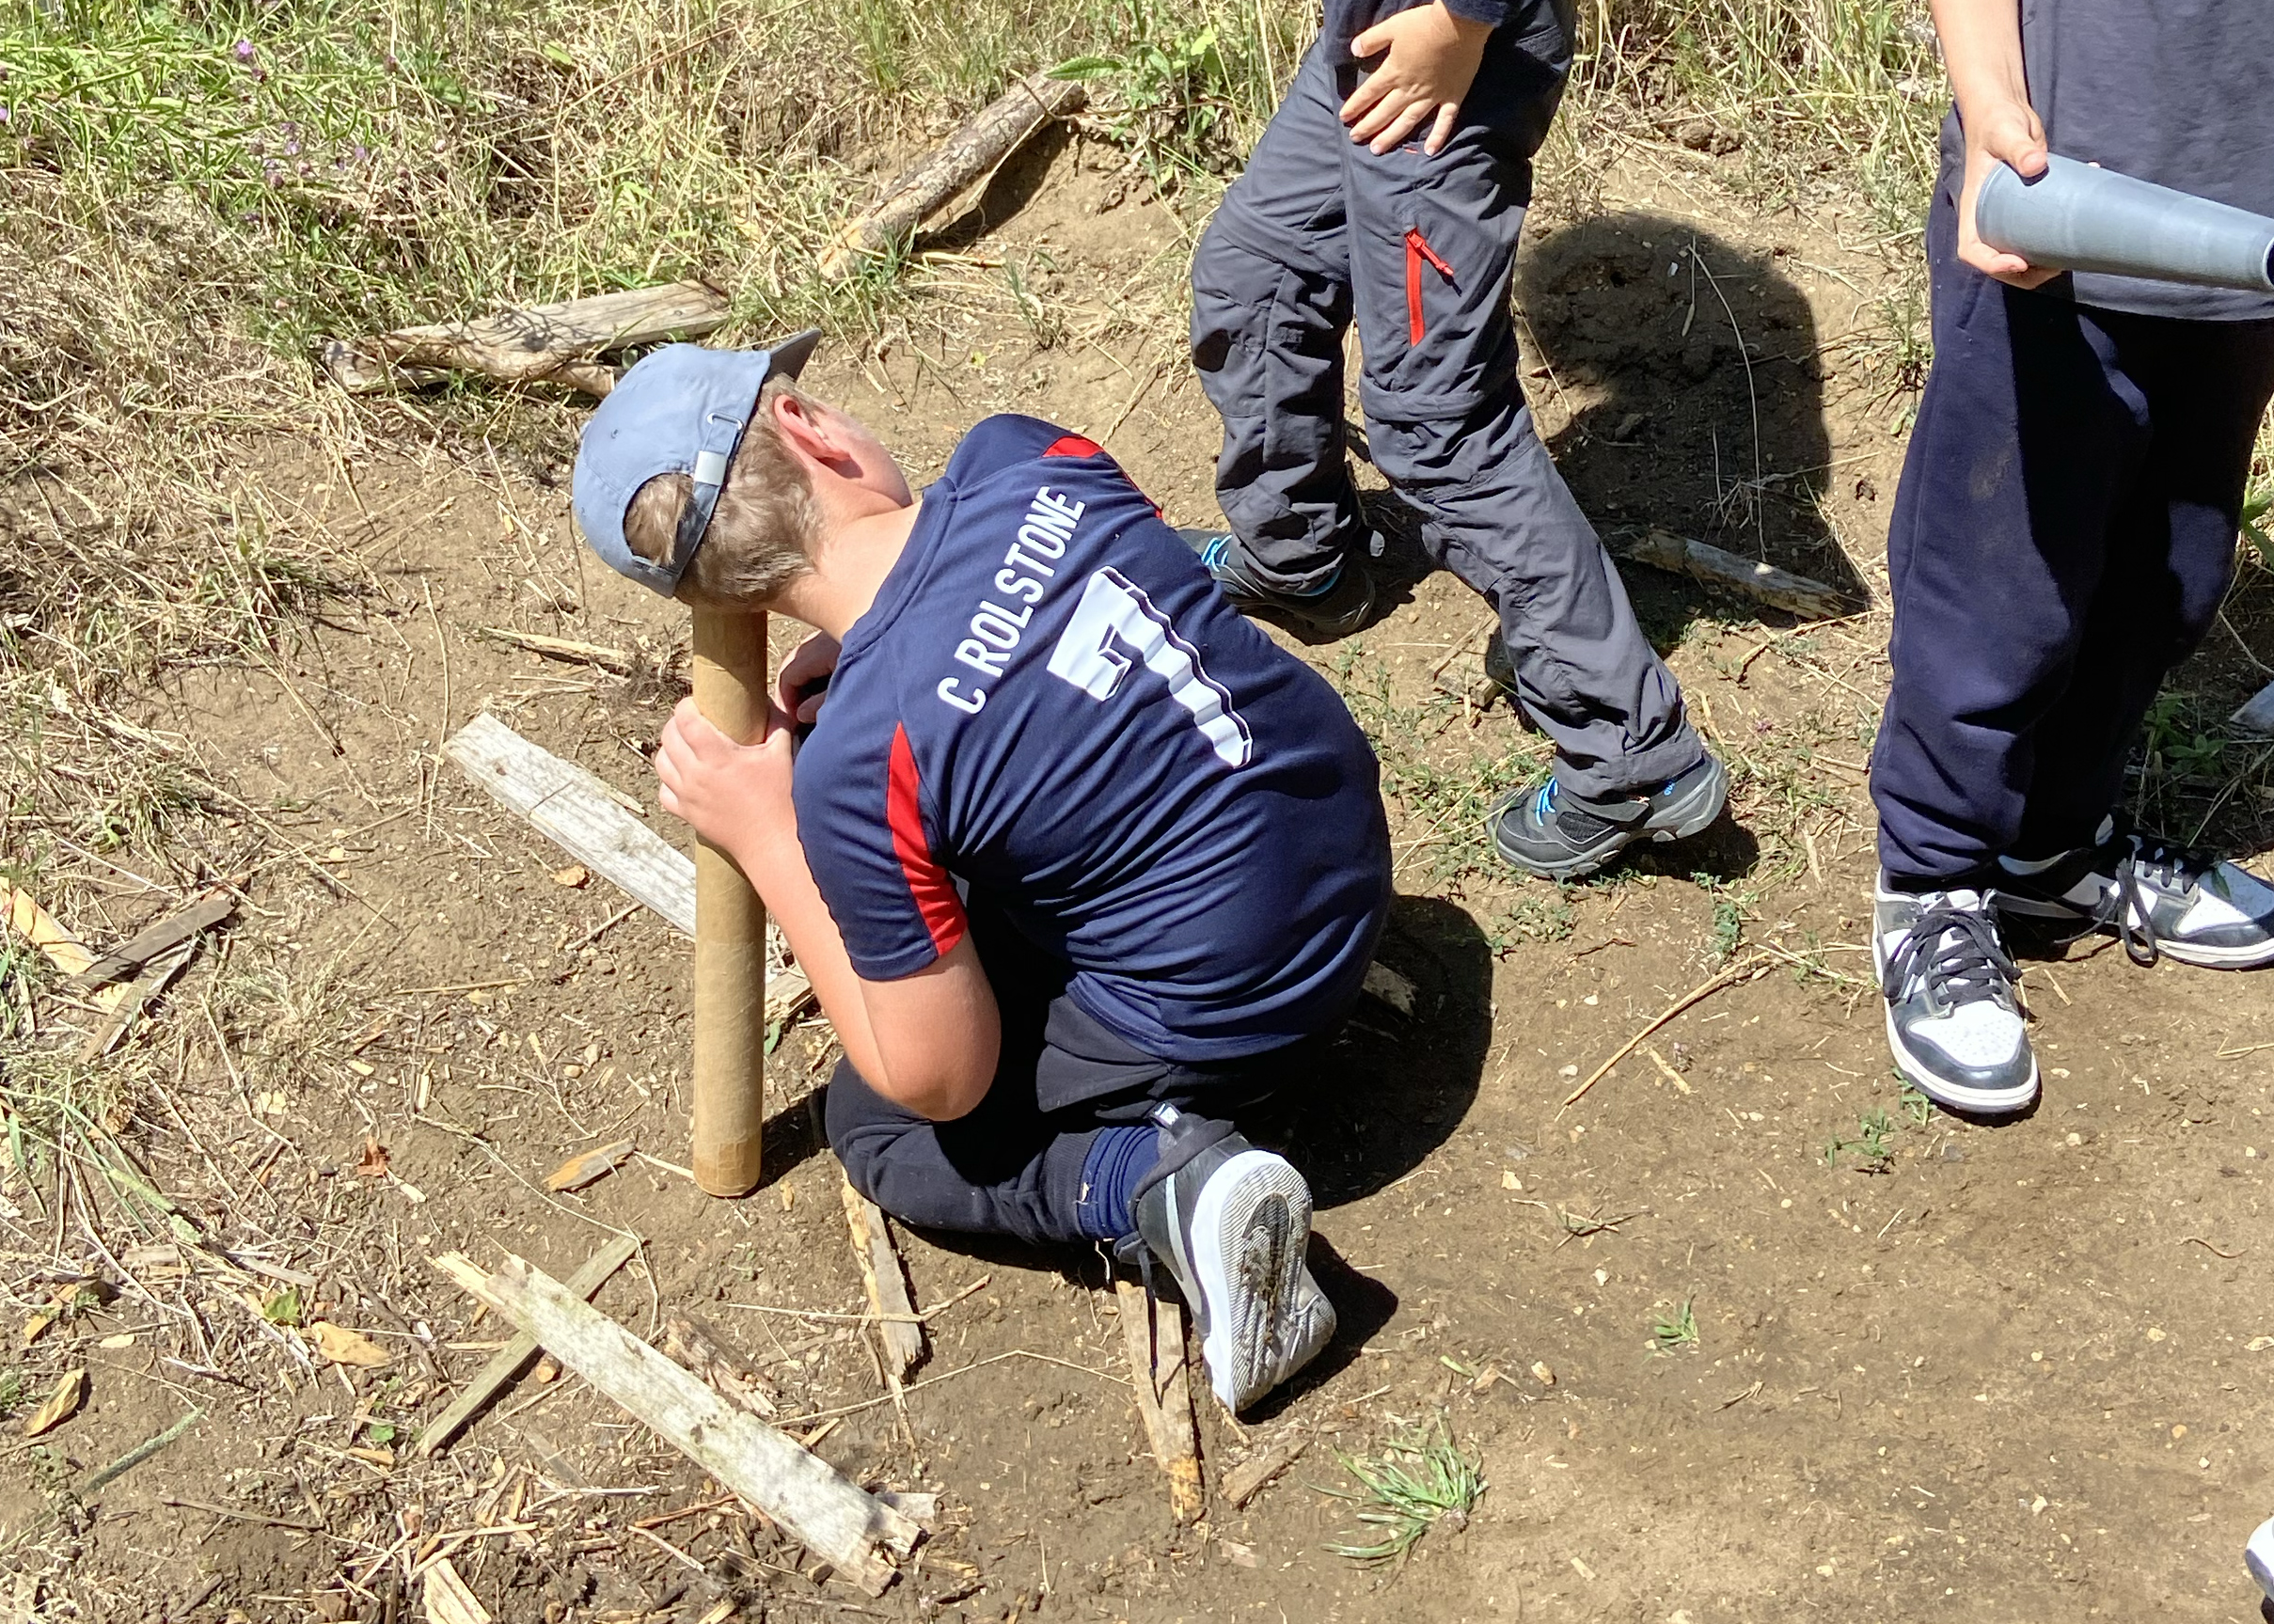
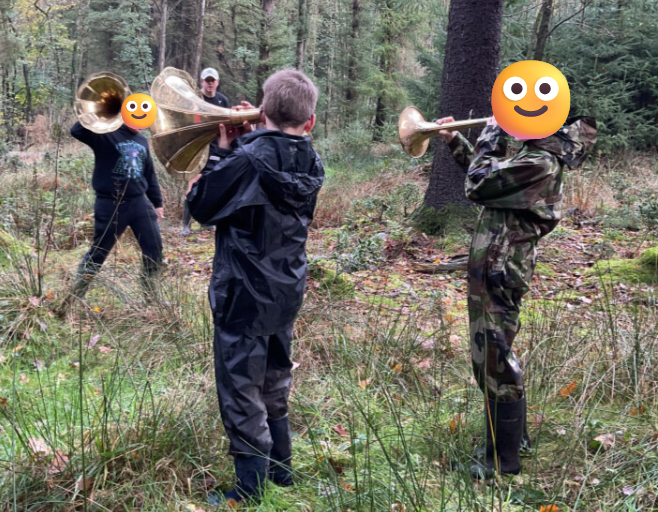
This hands-on investigation helps children experience how altering the way we gather sound can shift our listening perspective and deepen their awareness of the surrounding soundscape. This activity can be extended into a more in depth design and build activity with more construction materials and paper tape provided, so a variety of ‘listening enhancing devices’ could be constructed.
• LISTENING WITH TECHNOLOGY TO DISCOVER HIDDEN UNDERGROUND SOUNDS
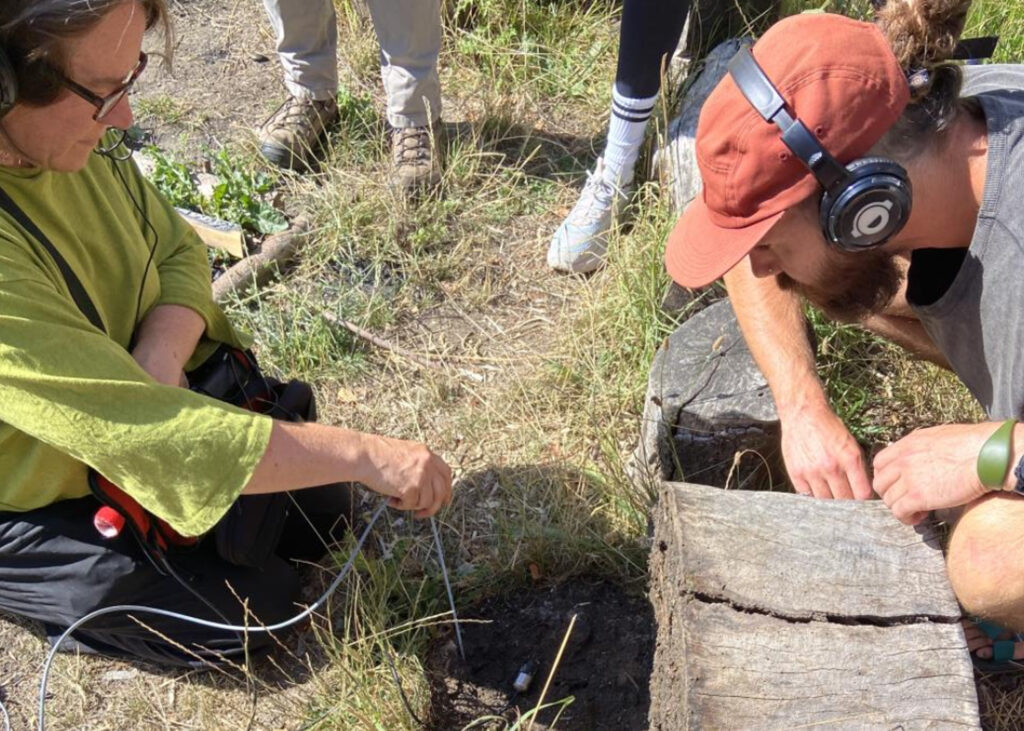
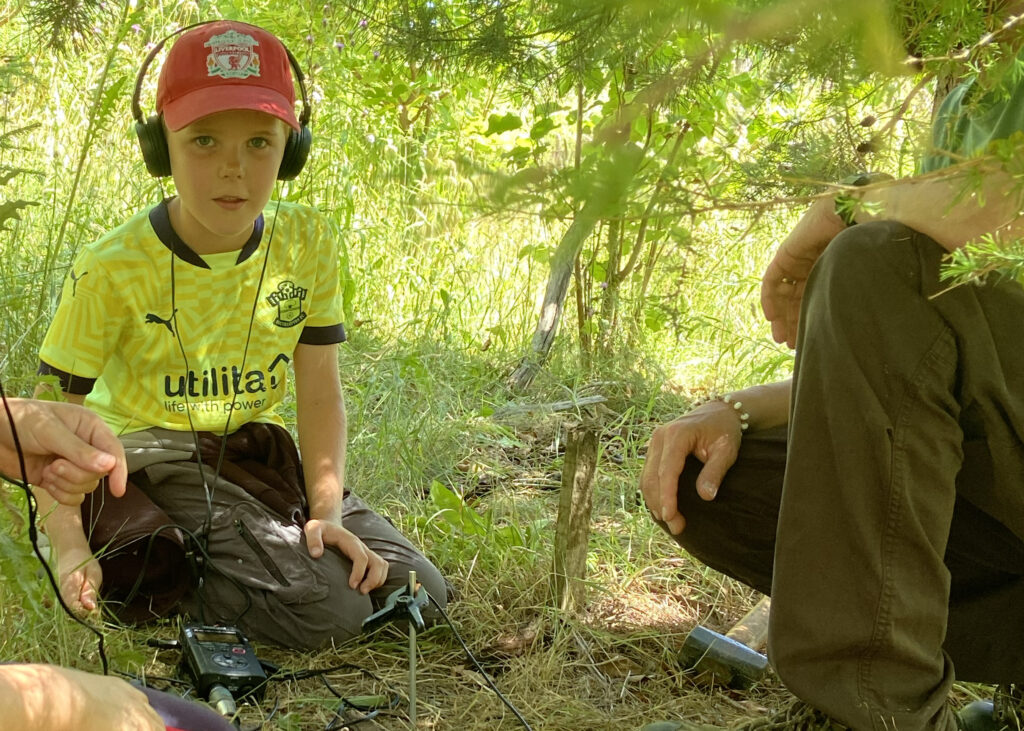
This activity invites children to explore sounds we cannot usually hear, using recording equipment to investigate what is happening beneath the ground. Working in pairs, children use a sound recorder connected to a contact microphone and headphones.
Download guidance on how to use the HEAR SOIL recorders, contact microphones and soil probes HERE.
Place children in pairs and demonstrate how to handle the equipment carefully. It is important to emphasise how to gently press the probe into the soil, being mindful to take care and not disturb other creatures that are living there. Emphasise taking turns: one child can position the probe and microphone while the other listens, then they swap. Encourage quiet, calm working so that surface noise does not interfere with listening.
Explain that these types of microphones can pick up vibrations through solid objects, such as soil, wood, or stones. Maybe suggest that they are going to become “sound explorers,” listening for tiny movements beneath their feet.
Encourage children to:
– Listen for scratching, rustling, crunching, or faint tapping sounds.
– Notice differences between dry and damp soil.
– Compare sounds in different locations (under leaves, near tree roots, in open ground).
You may wish to pause the group at intervals to share discoveries. Ask questions such as:
– What did you hear?
– Did it sound loud or quiet?
– What do you think might have made that sound?
There may not be much sound, depending on the location and season, weather conditions
– Can we hear everything that makes a sound?
– What might be happening underground that we can’t usually hear?
At this stage, it is fine if children are guessing – curiosity and observation are the key goals.
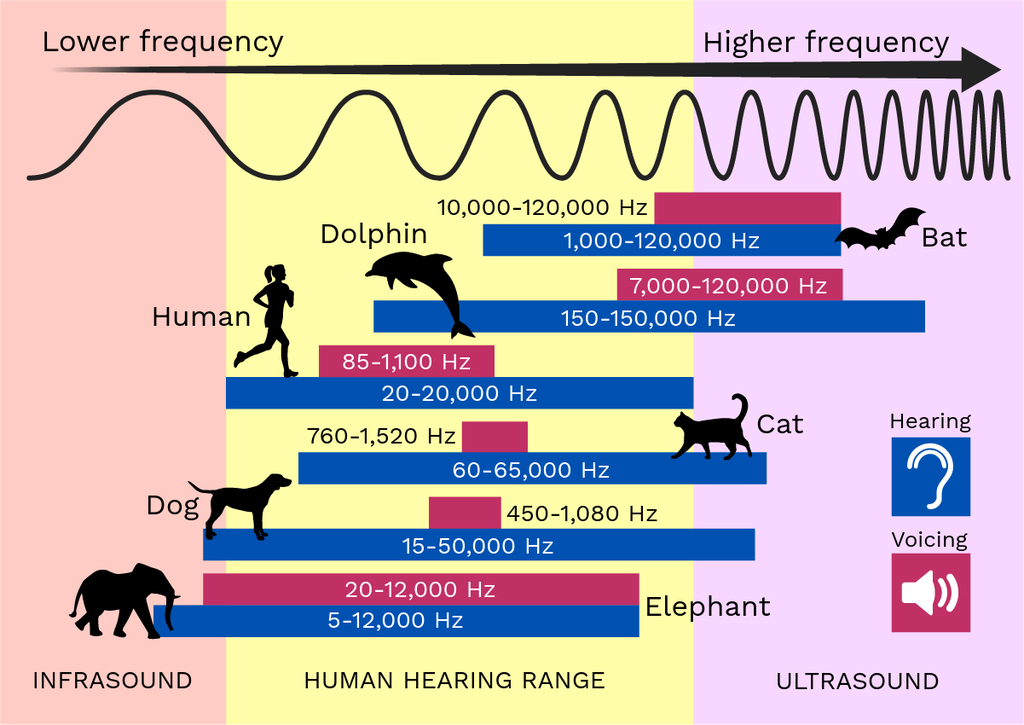
Another nice stimulus is a graph showing how different species hear and make sounds in different sound ranges and some sounds may be too high or too low for us to hear – which starts to open up a fascination with the soundworld that is outside our hearing range.
Conclude by gathering the children to reflect on what their recordings suggest about life underground. Highlight that soil is not just “dirt” – it is a habitat full of living organisms such as worms, insects, and microorganisms.
As a conclusion to this session, if possible, you could play some sounds of soil recordings from the library of sounds on a portable speaker to give children an insight into sounds that can be heard in soils from other places. Some of the sounds will be labelled with the creatures making the sounds, which makes a nice link to the next session on Soil Ecology. LIBRARY OF SOUNDS (coming here soon).
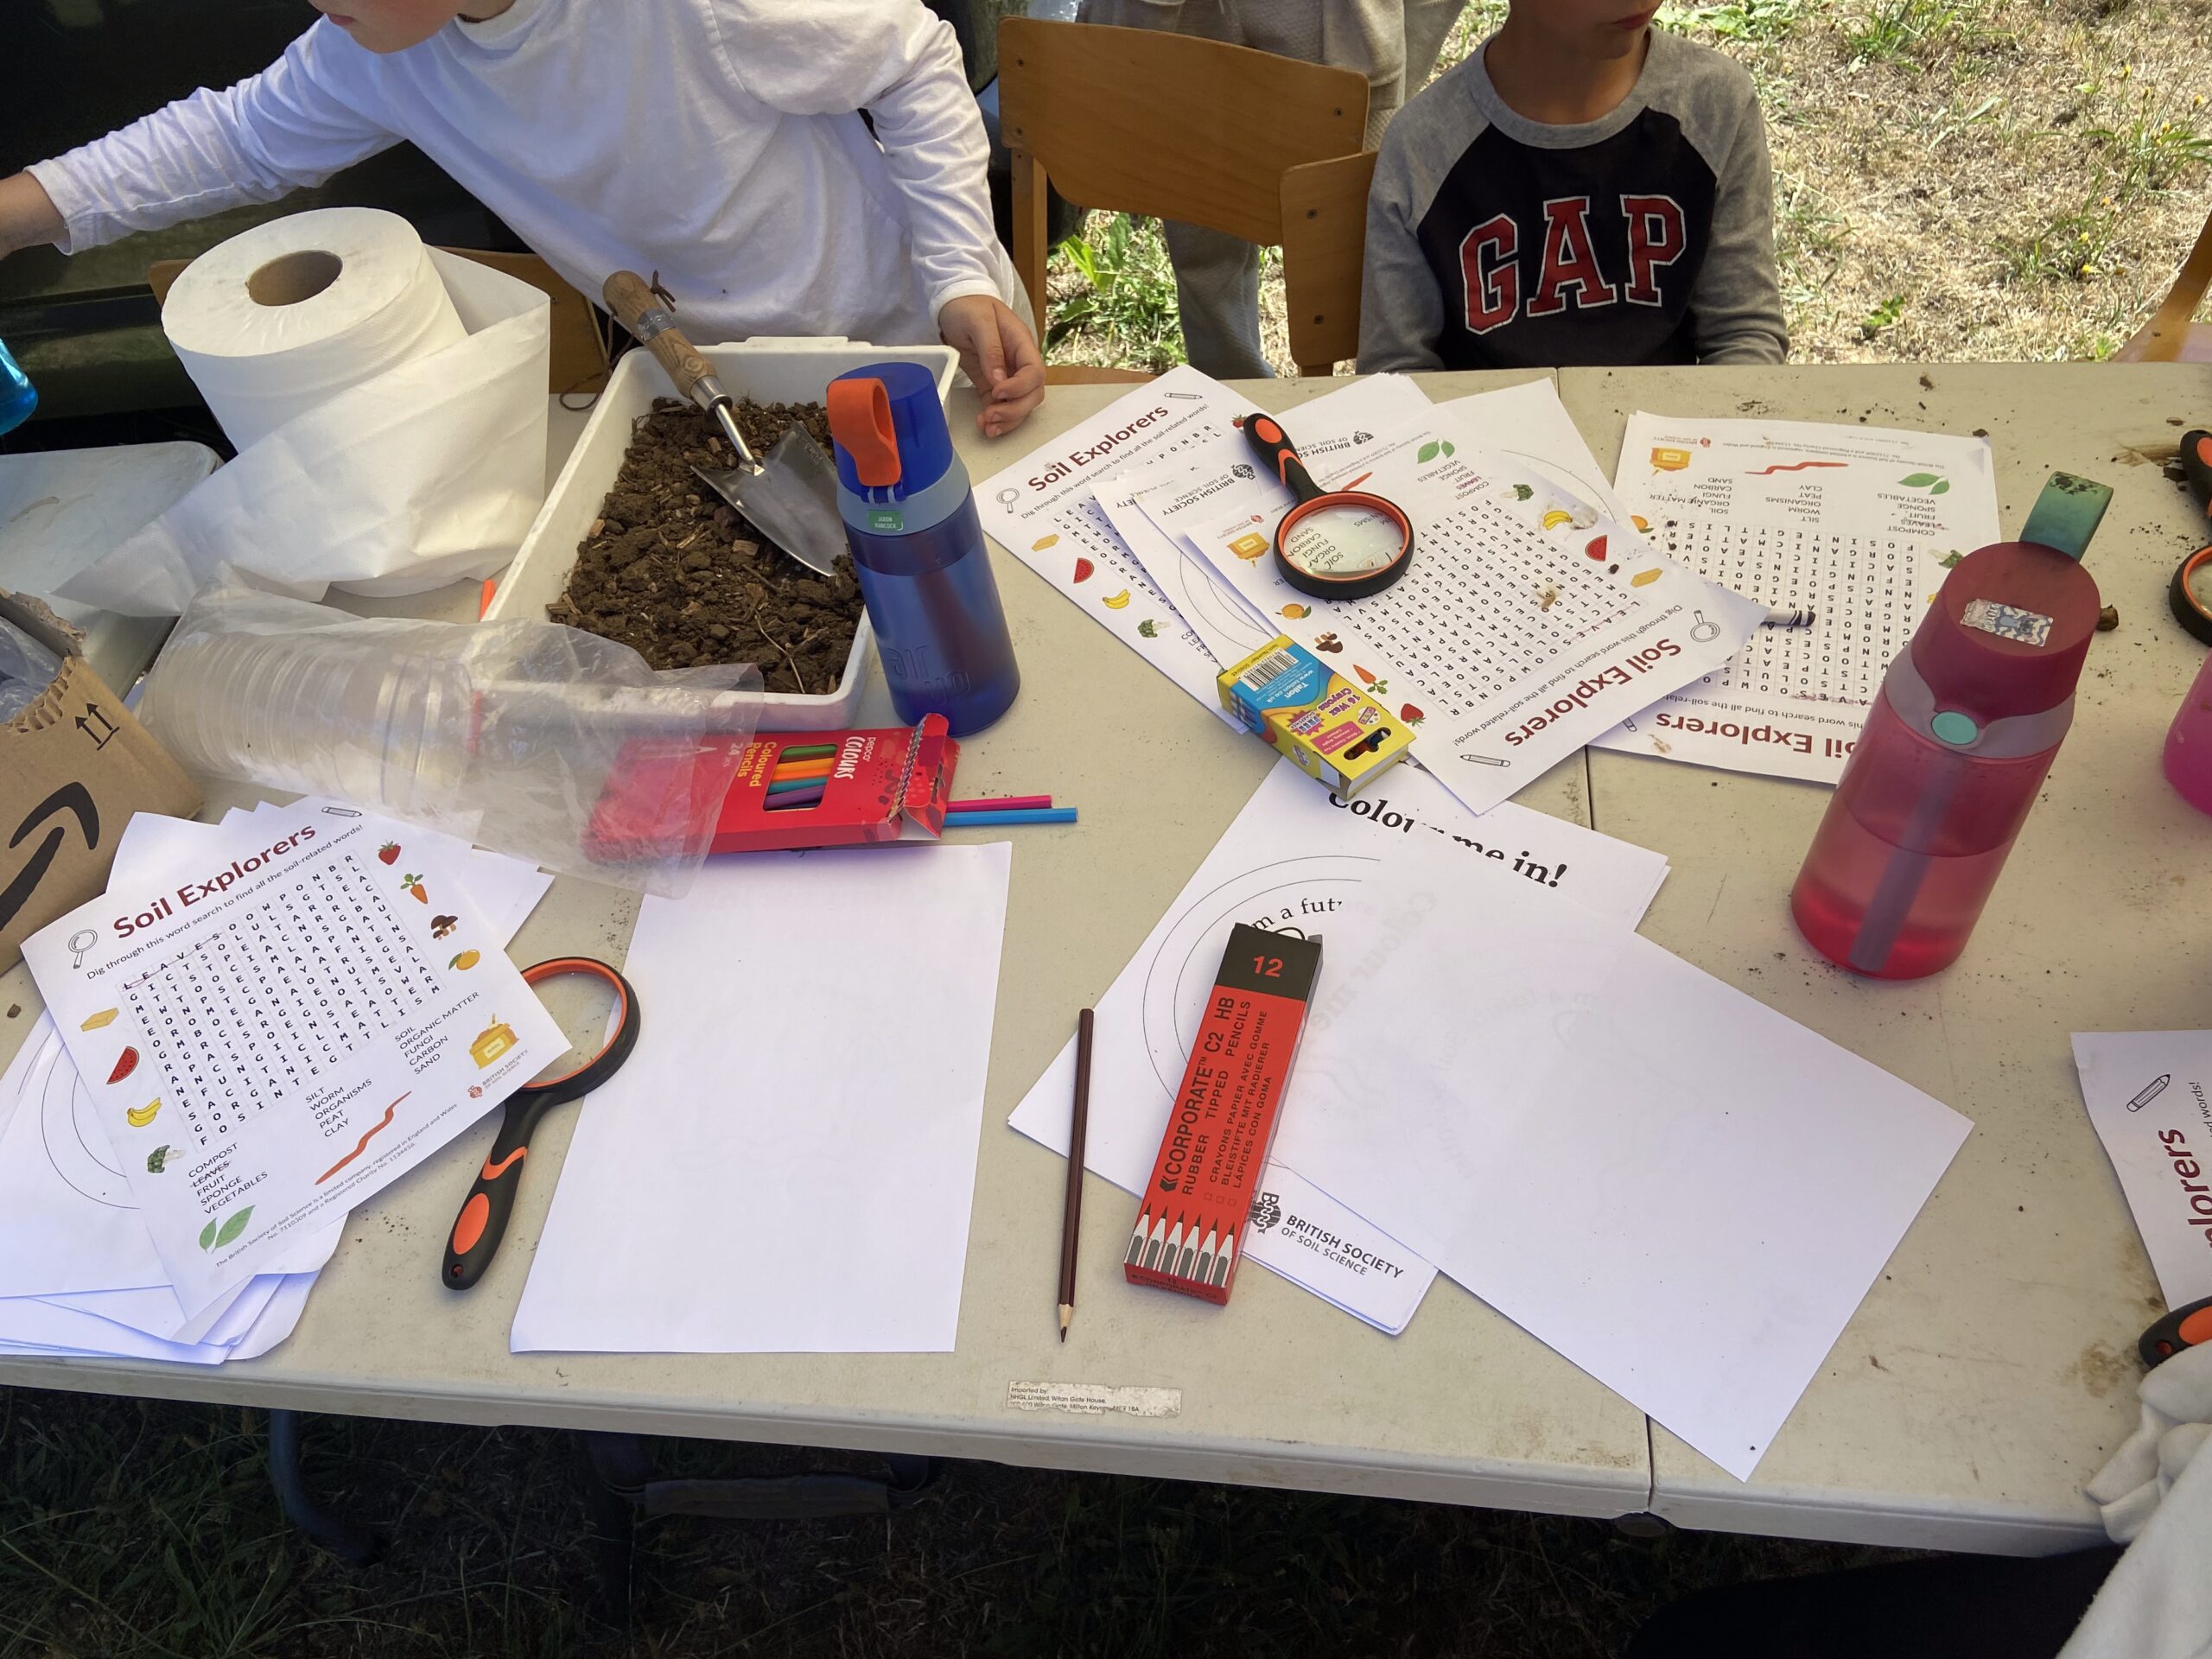
• LEARN ABOUT SOIL ECOLOGY
Now that we have listened carefully to the sounds beneath our feet, we are going to become soil explorers in a new way. This time, we will use all of our senses to help us discover more about the soil.
Ask the children to look closely at the soil. What colours can they see? Are there tiny stones, roots, leaves, or any creatures in there? Encourage them to gently touch the soil. Does it feel dry or damp? Crumbly or sticky? Smooth or gritty? If appropriate and safe, invite them to carefully smell the soil. What does it remind them of? Can they describe the smell?
Some questions could be
– What do you notice when you look closely?
– How does the soil feel in your hands?
– Can you spot anything living in it?
Explain that soil is much more than just “dirt.” It is a busy habitat full of living things. By using our senses, we can begin to understand how important soil is and why so many creatures call it home.
Remind children to handle the soil gently and respectfully, as they are exploring a living environment. This careful observation will help them learn more about soil ecology and the important role soil plays in helping plants grow and supporting life above and below the ground.
LINK TO EDUCATION RESOURCES FROM BRITISH SOCIETY OF SOIL SCIENCE for teaching children more about Soil Ecology and a guide to which species that might be living in the soil.
• INDOOR SESSION: LISTENING, MUSIC & SOIL DATA
For these activities, to get started, we have prepared a library of environmental sounds from soil and watery habitats. Water sounds are provided by Kathy Hinde and Soil Sounds are provided by Dr Sam Bonnett and his team at UWE. You are encouraged to start your own library of sounds to use with the music tech applications and create your own music using sounds you have recorded yourself.
SOIL SOUNDS – HERE
WATER SOUNDS – HERE
SHORT SOIL SOUNDS – HERE (for Music Tech App – Sample Keyboard)
SHORT WATER SOUNDS – HERE (for Music Tech App – Sample Keyboard)
SHORT WATER SOUNDS 2 (DRIPS) – HERE (for Music Tech App – Sample Keyboard)
DOWNLOAD THE FULL LIBRARY HERE
To listen to live streams of environmental sounds all over the world, visit the Locus Sonus soundmap HERE
To record samples from these live streams – use this tool HERE
This session builds on the children’s outdoor soil exploration and sound recording. It brings together listening, music-making, science, and early data awareness in an imaginative and accessible way. The following bullet points outline the learning aims for this session
– To listen carefully and represent sounds in different ways
– To consider that sounds can be the basis of music-making, and traditional musical instruments are not
the only way to make music.
– To explore how sounds can be changed using simple music technology.
– To work together to create and perform as a group making music together.
– To begin to understand that sounds and numbers can both give us information.
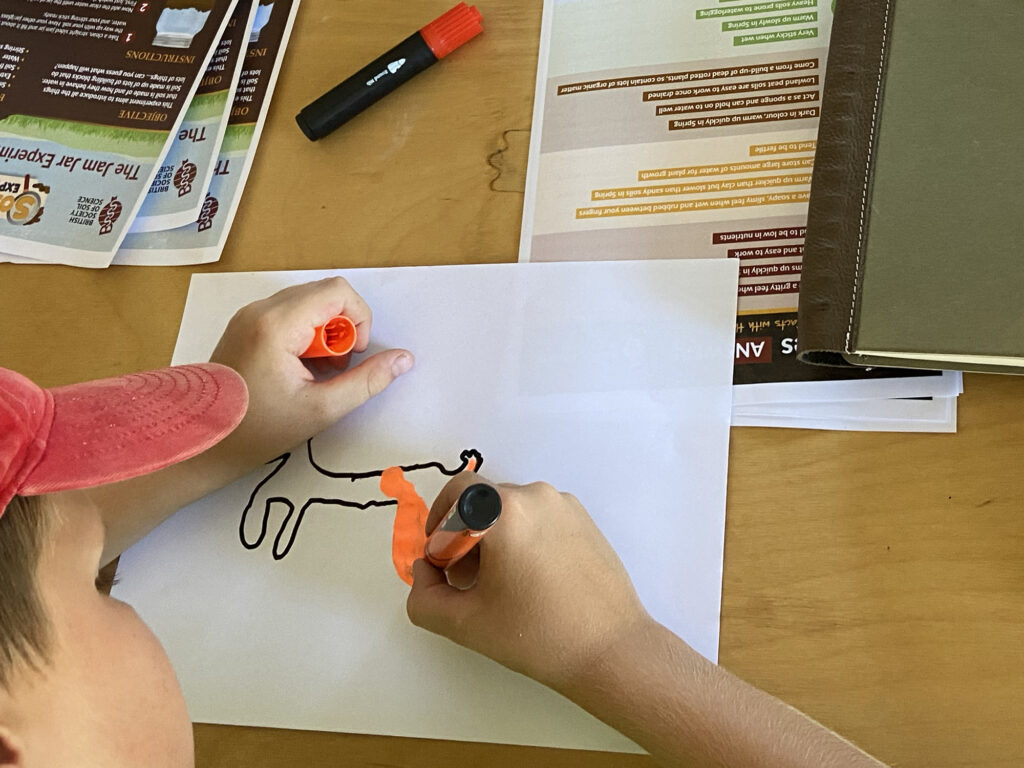
Warm-Up 1: Listening and Drawing Sounds
Starter activity 1 (Whole Class, 10 – 15 minutes)
Play back some of the soil recordings collected outdoors. Ask the children to close their eyes and listen carefully.
Some prompt questions could be:
– Was the sound smooth, scratchy, bumpy, quiet, loud?
– Did it stay the same or change over time?
Show simple examples of graphic scores (lines, shapes, dots, swirls). Explain that composers sometimes draw sounds instead of writing traditional music notes. Some freely available video examples
Iannis Xenakis – Pithoprakta is a graphic score that is performed by an orchestra
Györgi Ligeti – Artikulation is a graphic score created as a listening guide to an electronic composition
These examples introduce the idea of a musical score, with symbols, shapes, colours and marks that become guidelines for sound-making. These examples also introduce the idea that they can be read in the same way as reading writing, from left to right by many people at once, who are reading the score at the same ‘pace’ – in time with each other.
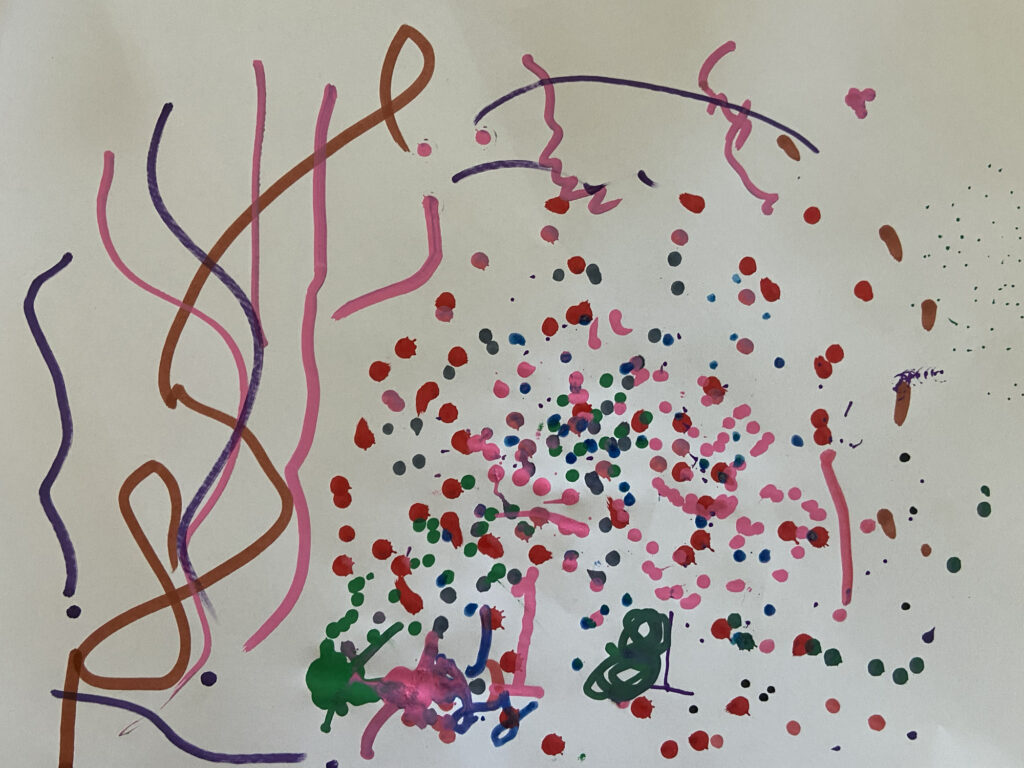
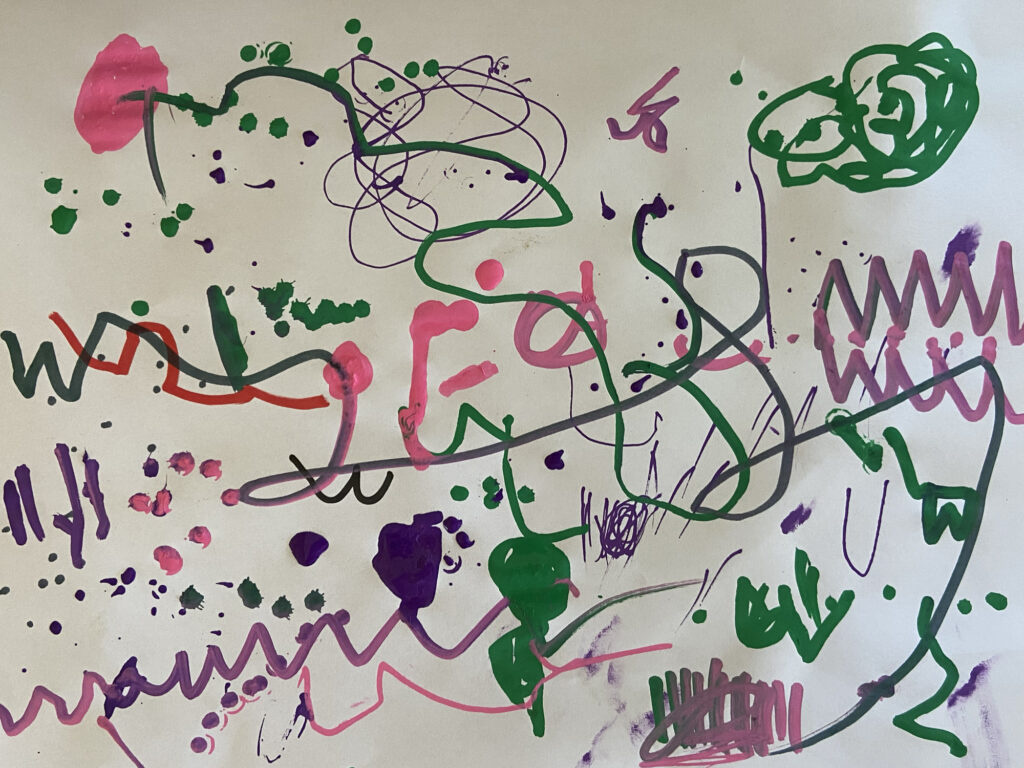
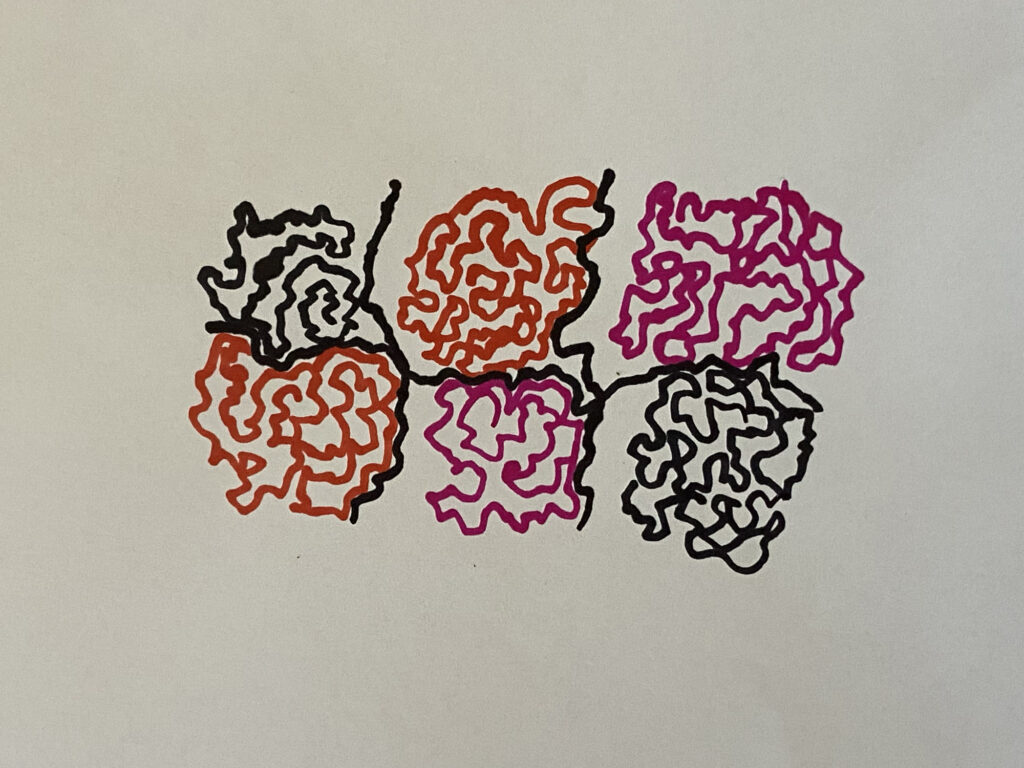
Activity: Children draw what they hear. If you feel they need some starting points to get them going, you could suggest ideas like the following, but it may be better to let them find their own visual sound language to start with – but encourage abstraction over trying to draw pictures of soil or creatures. This will become clear later, as we further explore graphic scores.
– Wavy lines for smooth sounds.
– Jagged marks for scratchy or crunchy sounds.
– Big shapes for loud sounds and small shapes for quiet ones.
– Repeating patterns for looping sounds.
– Clouds of marks for textures
– Dense marks for heavy sounds, light marks for delicate sounds
Reinforce that there is no single “correct” drawing, it is about exploring ways to represent what they hear in their own creative and imaginative way.
WARM-UP 2: Vocal and Body Sound Orchestra
Starter Activity 2: (Whole Class, 10 – 15 minutes)
As an alternative or additional warm-up, gather the class together and play a selection of the soil recordings. Invite the children to listen carefully and then try to imitate the sounds using only their voices, hands, or feet. They might create scratching sounds with their fingers, soft tapping with their feet, or gentle rustling with their hands.
Encourage close listening:
– Was the sound short or long?
– Was it quiet or loud?
– Was it smooth or bumpy?
You can begin introducing the idea of conducting by using simple hand gestures. Use gestures that feel intuitive, that do not need explaining – such as:
– Raised hands = louder
– Lowered hands = quieter
– Circular motion = keep going
– Flat hand = stop
Explain that they are becoming a “Soil Sound Orchestra.”
Circle Sound-Wave Game
Sit or stand in a circle to create a shared performance space.
- Copy the Leader
One child begins by making a simple sound gesture (e.g., rubbing hands, tapping knees). The rest of the group copies, so everyone is making the same sound together. This builds unity and listening. - Send the Sound Around the Circle
Introduce a new sound. Instead of everyone changing at once, ask one child to begin. The next child copies, then the next, sending the new sound around the circle like a wave. Continue until the whole group has changed to the new sound. - Create a Child-Led Sound Wave
Invite different children to invent and “send” their own sound around the circle. Watch how the texture gradually transforms as the sound travels from one side to the other.
This activity helps children:
– Listen carefully to one another.
– Notice how sounds change when made by many people.
– Experience how musical texture can gradually shift.
– Begin understanding ensemble awareness and group coordination.
It also reinforces the idea that even simple sounds, like those heard in the soil, can be shaped, organised, and performed together, just like an orchestra of instruments playing together.
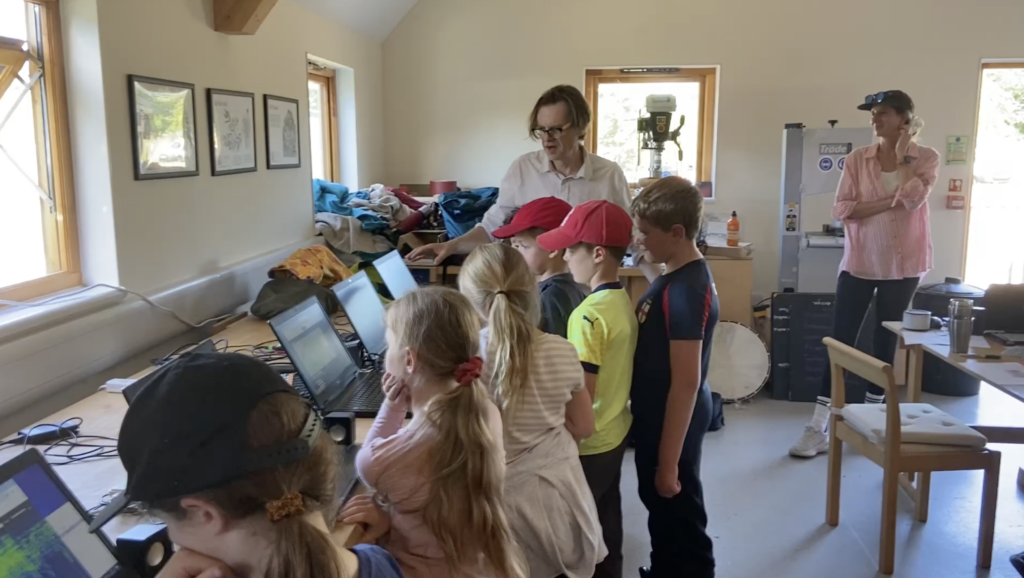
A series of browsers based apps have been created by Matthew Olden. These apps are designed to work directly on your internet browser on a computer, laptop, ipad or phone, without the need to download or install software. YOu are encouraged to uyse your own sounds,but to get started you can access the sound library (links above) which need to be downloaded to the device you are using the apps on.
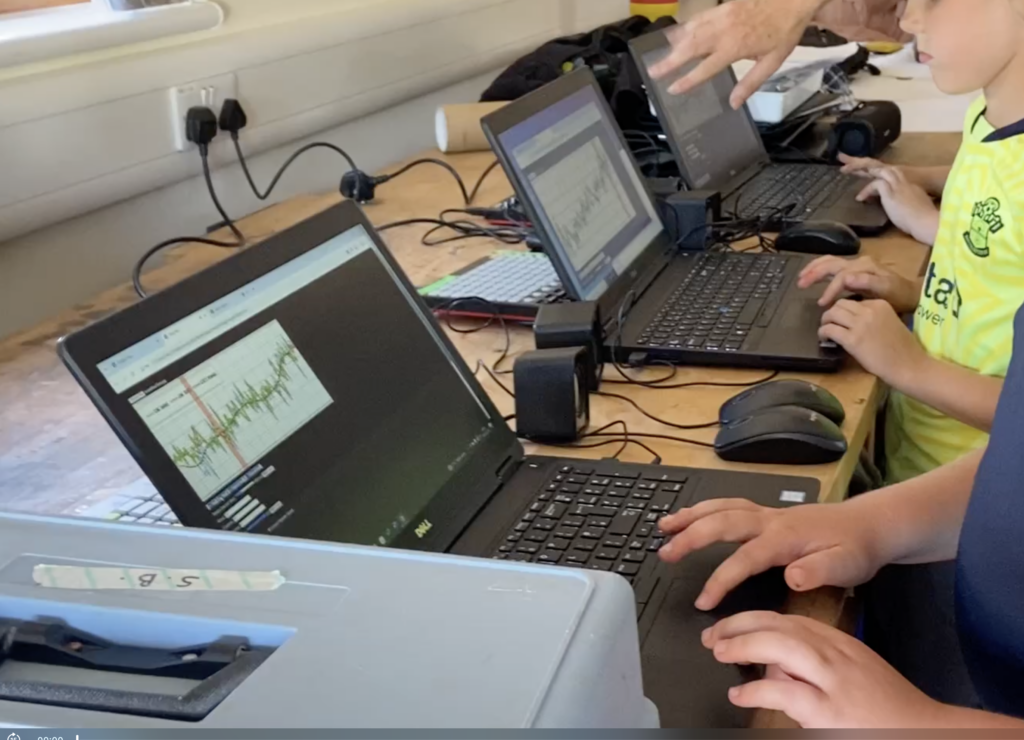
MUSIC TECH ACTIVITY 1: Seeing Sound : Spectrograms
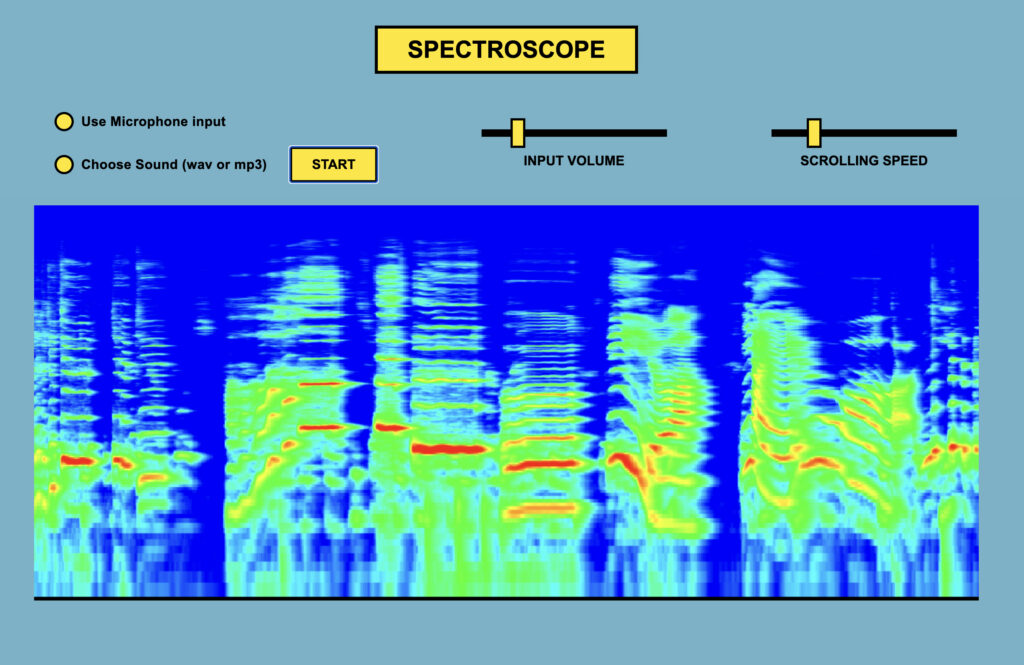
ONLINE MUSIC TECH APPLICATION : HERE.
Whole Class Demonstration (10 minutes)
Using the online music application, show the children one of their soil recordings as a spectrogram
Explain in simple terms:
– The picture shows sound
– The colours and shapes show how loud or soft the sound is
– High sounds are ‘higher’ in the image and low sounds are ‘lower’
– The picture is ‘scrolling’ to show how the sounds are made over time, a bit like a music score
When explaining it may also be helpful to select the microphone input to feed directly into the spectrogram software to show the direct links between the sound and the image. Explore this by making loud / quiet sounds as a group and shifting from low sounds to high sounds. Try out the ‘conducting the body orchestra’ task with the spectroscope on, and see how the ensemble sounds visually.
“Just like we used our ears to listen, scientists sometimes use pictures like this to help them see sounds.”
Make connections to help the children make sense of the relationship between sound and image:
– Thick, bright areas = louder or stronger sounds.
– Thin or faint areas = quieter sounds.
Listen to the sounds from the soil recordings and see how the sounds look on a spectrogram, set up the children with the online music tech tool “Spectrogram” (linked above) to explore the spectrograms of soil sounds. This can be couple with using the internal microphone on the laptop or tablet to more fully understand how a spectrogram works by making their own sounds and looking at the results.

Exploring and Changing Sounds with Music Tech
The next two activities build children’s confidence in playing, shaping and organising sound before bringing the class together as a performing group.
MUSIC TECH ACTIVITY 2 : “SAMPLE Keyboard”

ONLINE MUSIC TECH APPLICATION HERE
Sounds to use with this app work best if they are short durations. You can either:
Record short sounds using the HEAR SOIL recording equipment (or similar).
Record short sounds from the live streams (see intro to these sessions above)
Download the library of sounds for the Sample Keyboard (see intro to these sessions above)
The purpose of this activity is to explore playing a selection of different short sounds from the soil like an instrument, and understand how changing pitch and volume alters the sounds. If midi controllers are available at the school, then the midi controls can be mapped to some of the controls to make it more like playing an instrument – so the volume and speed sliders can be mapped to physical sliders.
What the Tool Does
A set of soil samples are loaded onto different keys.
– Children can press keys to trigger sounds on the computer keyboard or tablet keypad using the 10
keys on the top row. Q W E R T Y U I O P
– They can change the speed with a slider (it will also pitch higher/lower).
– They can adjust the volume with a slider (louder/quieter)
– They can play short or long sounds depending on how long they hold the key down
Introduction (Whole Class Demonstration, 5 to 10 minutes)
Show the class how:
– Each key plays a different soil sound.
– Speed can be shifted up and down.
– Volume can be changed.
Use simple musical language:
– High / Low (fast / slow)
– Loud / Quiet
– Short / Long
Explain that they are going to “play the soil” like an instrument.
Paired Exploration (15–20 minutes)
Children work in pairs on headphones with a headphone splitter, they can take turns as:
– Player (pressing keys and adjusting controls)
– Listener (comment on the experience by listening carefully)
Set small challenges:
– Can you play three different sounds in a row that you think ‘go well together’ ?
– Can you make a pattern of sounds and then repeat them ?
– Can you play a series of sounds focussing on making a rhythm ?
– Can you play only high sounds? Only low sounds?
– Can you make your sounds very quiet and gentle?
Encourage careful listening between sounds and decision making, not constant pressing. If midi controllers are being used, then there are ways to play as a pair together – one person pressing keys and the other controlling volume and pitch.
MUSIC TECH ACTIVITY 3: “Sound Shaping Lab”
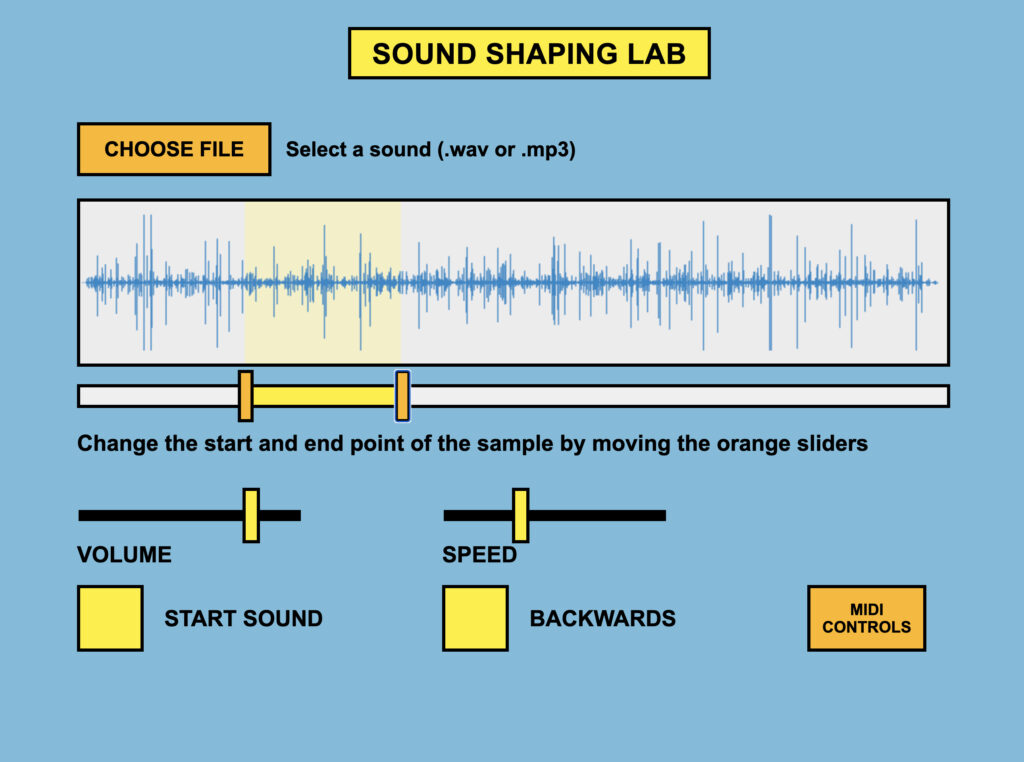
ONLINE MUSIC TECH APPLICATION HERE.
To get started download the library of sounds or use your own sounds recorded from nature or from live streams (see intro to these sessions above for sound libraries)
The purpose of this activity is to explore how one sound recording at at time can be transformed by changing loop points, speed, pitch, direction and volume. The results of this exploration will create more continuous textural soundscapes, in contrast to the previous task which will have produced more discrete ‘on/off’ sounds.
What the Tool Does
- Uses one soil recording at a time.
- Children can:
- Loop a section.
- Make the loop shorter or longer.
- Change playback speed (faster/slower) – NB slow is also lower in pitch.
- Play it forwards or backwards
- Adjust volume.
- If there is access to a midi controller, then all the controls can be mapped to a physical controller to make it more playable like an instrument.
Introduction (Whole Class Demonstration, 5 – 10 minutes)
Play the original sound first, then demonstrate:
– Looping a short section (tiny scratch or tap).
– Looping a longer section (more continuous texture).
– Changing the speed
– Making it high and squeaky or low and rumbly.
– Making it change from forwards to backwards – select a section you think works best for this effect
Ask:
– Does it still sound like soil?
– What changed the sound the most, speed, pitch, or length?
Explain that they are “sound scientists,” experimenting with what happens when we change one thing at a time.
Small Group Exploration (15 – 20 minutes)
Children experiment with:
– Creating a tiny repeating loop that contains a sound that creates a pulse (like a heartbeat).
– Move the same length loop to different points in the sample to change the sound that is repeating but
keep the looping rhythm the same
– Making a long, slow background sound
– Turning the volume up slowly and then down again.
Encourage them to:
– Change only one control at a time.
– Listen carefully before changing something else.
– Notice how shorter loops often sound more rhythmic.
Set a simple challenge:
– Create a 15-second sound that changes at least once (e.g., starts slow and becomes fast).
Record these activities using a hand held recorder at the front of the class, or an ipad / computer with a built in microphone.
MUSIC TECH ACTIVITY 4 : Ensemble Playing & Conducting
Bring the class together as a “Soil Sound Orchestra.” Each group plays their altered sound afrer making a selection about what they want to choose.
Divide the class into two groups:
Soil Sample Keyboard players
Sound Shapers
Introduce simple conducting signals:
– Hands high = louder.
– Hands low = quieter.
– Circular motion = loop.
– Stop gesture = silence.
Children take turns being the conductor, shaping how the group performs, which develops
– Listening to others.
– Turn-taking.
– Awareness of texture (many sounds together).
– Early ensemble skills.
Ideas for further Ensemble play :
Round 1: Layers
Sound Shapers create a quiet looping background.
Keyboard Players add single sounds on top.
Round 2: Contrast
One group plays loud and busy.
The other plays slow and quiet.
Round 3: Conductor’s Choice
A child conductor decides:
– Who plays.
– When to change volume.
– When to stop.
Round 4: improvisation with some rules
General rules for free improvisation are generally around
– Listen more than you play – (play for about 1/3 of the time)
– Leave space (not everyone all the time)
Some useful rules to encourage this to happen are
– Only 3 people can play at any one time, if a 4th person starts playing, someone has to stop
Keep each performance short (30–60 seconds, although the improvisation could be longer, e.g. 3 minutes).
Play like an ecosystem
Play an example of how species make sounds in an ecosystem – they don’t all constantly make their sounds at the same time. A species-rich underwater soundscape to listen to HERE. Carefully observe that some species only very frequently make their sounds. Introduce this idea as a way to help the children think about their improvisation as an ecosystem in which they collaborate so everyone can be heard and not drowned out by constant loud sounds.
Help the children realise that by playing all together, they can all do smaller parts of an overall soundscape. Some further ideas for restrictions on how to create a more balanced soundscape. E.g.
– triggering a short sound and leaving space around it
– fading a low slow texture slowly in and out, leaving some space before repeating
– gradually slow down a loop from veyr fast to very slow
– carry out your procedure only THREE TIMES during the improvisation
After the conducting and exploring ensemble playing, it may be possible to return to the examples shown earlier of graphic scores – and see if they can follow a graphic score as an ensemble. Some of their ‘drawn soundscapes’ might also be suitable to use as a graphic score. The sound to image and image to sound relationships that have been developed throughout this session can be explored in multiple ways.
Returning to the graphic scores can reinforce the ideas around reading a score together at the same pace, and how a still image can shape and a soundscape over time by ‘reading it’ together ‘in time’.
Reflection
Ask:
– What happened when everyone played at once?
– When did it sound clear?
– Did it sounds like music?
Reinforce the interdisciplinary idea that they have:
– Used listening skills (music).
– Used technology (digital skills).
– Explored sound as information (science).
– Organised sound together (ensemble performance).
– Begin to understand how musical scores works.
This prepares them for the next step, using scientific graphs and soil data to guide how they change their sounds, showing that numbers, listening and music can all help us understand the world.
MUSIC TECH ACTIVITY 5 : Turning Data into Music (Simple Data Sonification)
ONLINE MUSIC TECH APPLICATION : HERE
Demo on how to use it HERE – get started with the sounds provided
Introduce simple graphs showing:
– Soil quality data (e.g. moisture levels).
– Weather data (e.g. rainfall or temperature).
Keep explanations age-appropriate:
“These lines show information scientists have collected.”
“Just like our sound pictures showed sound, these graphs show numbers.”
Explain that numbers can be turned into sound.
The example shows the map of the area that the sounds were gathered, which is also an interesting way to categorise the data to play back, and also relates very closely to the graphic scores the children have previously been exploring.
You will need to prepare some graphs or maps as jpg images that are relevant to the location or data gathering you have been doing. The ideal image size to use with this app is 1000px x 400px
Activity:
First or all set a task for the children to manually follow a graph using one element of their sample (pitch, speed, or volume) and change it according to the graph. For this they can use the music tech tools they have already explored, or they can use their voices, hands and feet from the body orchestra session:
– Higher line = higher pitch.
– Lower line = lower pitch.
– More rain = louder sound.
– Less rain = quieter sound.
Keep it simple and exploratory – the aim is understanding the idea, not precise mapping in this first exercise. The next stage is to move to the online music tech application ‘Map and Data player’
Step 1: Load the Image
Upload an image of a graph (e.g. soil moisture over time, temperature changes, rainfall levels) or a simple map with measurable data.
Ensure pupils can clearly identify:
– High points
– Low points
– The direction of the line
Brief discussion:
– Where is the highest point?
– Where is the lowest?
– Does the line rise gradually or sharply?
Step 2: Create Data Points (Nodes)
Using the tool:
– Pupils place nodes (points) along the line of the graph or key locations on the map.
– The nodes should follow the shape of the data.
– To begin with, encourage consistent spacing if the graph represents time.
Explain that each node will act like a musical instruction.
Step 3: Choose a Sound and an Effect
Pupils then:
Select one sound sample and choose one musical effect to control using the data. For example:
– Pitch (higher = higher on the graph)
– Volume (higher = louder)
– Speed (higher = faster)
For clarity, it is best to start with pitch mapping. Explain the mapping clearly:
“The higher the node on the graph, the higher the sound will be.
The lower the node, the lower the sound.”
Step 4: Play the Graph as a Score
When the image is played:
– The system reads the nodes from left to right (like reading a musical score).
– Each node triggers the chosen sound.
– The sound changes according to its vertical position.
Encourage pupils to listen carefully:
– Can you hear when the data rises?
– Does a steep climb sound different from a gradual slope?
– Where does the music feel calm? Where does it feel dramatic?
Step 5: Reflection and Analysis
Discuss:
– Could you hear patterns?
– Did the sound help you understand the data differently?
– Was it easier to notice sudden changes by listening or looking?
– How might this be useful in real scientific research?
You may explain that scientists sometimes use sound to:
– Monitor climate data
– Track animal movements
– Detect patterns in large datasets
Listening can sometimes reveal patterns our eyes miss.
Extension Ideas
Compare two different graphs using the same sound.
Use different effects (e.g. one group controls pitch, another controls speed).
Combine two datasets and layer them as an ensemble performance.
Learning Outcomes
By the end of this activity, pupils should:
– Understand that data can be represented in multiple ways.
– Recognise that pitch, volume, and speed can be systematically controlled.
– Begin to grasp how interdisciplinary approaches connect music, computing, geography, and science.
– Develop critical listening skills linked to real-world data.
This activity reinforces the idea that sound is not only creative expression but can also function as meaningful information, allowing us to hear patterns in the world around us. When working with data sonification, we can combine our creativity with scientific analysis.
A few examples of sound maps that work in a simlar way to music technology sequencers or ‘scrolling scores’ – TWITCHR – and online birdsong soundmap that people can add bird recordings to. The map doubles up as a musical score and can be ‘played’ to trigger the birdsong sounds.
• ALTERNATIVE OPTIONS FOR RECORDING DEVICES TO USE FOR SOIL LISTENING
If you are not part of the HEAR SOIL pilot project and do not have access to the HEAR SOIL equipment –
You can use this app HERE to record sounds using an ipad, phone, or laptop that has a built in microphone.
There are various devices available to connect a contact microphone or a hydrophone to a phone or tablet.
Example HERE. This is called a ‘preamp’ that makes the microphone louder to you can record it.
Depending on the microphone you are using you may need an adapter.
You will need a 3.5mm MiniJack TRRS Female to 3 Pin XLR Male Adapter to use the DIY contact mic and hydrophones outlined on this site. Example of this adapter HERE
The device will also need an adapter that matches your phone or tablet input, (which you may already have). Examples for Apple HERE, and Android HERE.
• BUILD A CONTACT MICROPHONE TO LISTEN TO THE SOIL
This activity is best carried out in small groups. The design HERE is more suitable for KS3, and involves some soldering.